An often overlooked but critical engine component is the accessory drive system. This is the system that is driven by the belt or belts on the front or rear of the engine. On a standard engine, a single belt may drive all the components or several smaller belts may drive individual components. In either case, failure to inspect belts can result in costly repairs. To avoid this, it is necessary to be knowledgeable about indicators and inspection techniques that predict approaching problems.
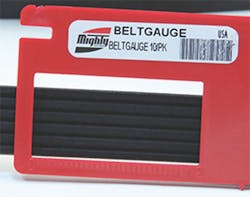
To help facilitate this inspection process, Continental has developed a unique belt inspection gauge that measures three types of belt wear.
By design, the belt is the most likely component of the drive system to fail and is measurably less expensive than other system component failures. Although the belt is typically the first component to fail, the actual cause may be triggered by problems with other components in the drive system.
The “V-Ribbed” belt — common on most vehicles produced in the last 10 years — is a highly-developed product based on EPDM polymer. This construction provides for high temperature resistance of 250 F (121 C) plus and low temperature resistance of -40 F (-40 C); good wear resistance and flexibility; and moderate oil resistance. However, the drive components are not always designed with the same advanced materials. Inferior components can cause premature belt wear, rib cracking, edge fraying, chunk out and breakage. With the Elite belt inspection gauge, simple measurements can be taken to prevent premature belt issues.
When performing accessory drive system service work, it is strongly recommended you inspect the system prior to removing the belt. Additionally, there may be no need to remove the belt if the visual checks meet expectations.
1. Inspect the system to make sure all components are aligned. Poor alignment is the No. 1 cause of belt noise. It can cause premature belt wear, rib skipping, edge wear and fraying. Check for abnormal rib wear (one side more worn than the other) or edge fraying (chipping) caused by pulley run-off. These are signs of belt misalignment.
2. Inspect the belt tension. Proper tension is the most critical part of belt maintenance and the No. 1 item overlooked during the installation procedure. The majority of all premature belt failures stem from improper tension. Make sure the tensioner is in the proper position, which can be determined by an arrow or mark on the tensioner.
3. Inspect the belt for rib cracks. Using the belt inspection gauge, place the two-inch window over the ribs of the belt. The best place to do this is over a backside pulley. If this is not easily accessible, use an area of the belt that is accessible. If two or more rib cracks appear within the window, you are on the verge of belt failure. Once two or more rib cracks appear in a single location and the cracks protrude to the cord, this is an area that will begin to chunk. Once chunking occurs, belt failure is imminent. Failure can occur within days or months, depending on the drive system. Under these circumstances, it is highly recommended the belt be replaced at the time of inspection.
4. Belt rib wear is one of the most overlooked issues. The primary contributors are inferior pulleys or misaligned drives. It can be difficult to detect, especially on the drive. The ideal method for detecting rib wear is to remove the belt from the drive. However, it can be done on the drive if there is sufficient room. Using the belt inspection gauge, place the ribs of the tool down into the ribs of the belt and shine a flashlight on the backside of the gauge. If you see light, the belt is OK. If not, remove the belt and repeat the inspection process to confirm. Once the belt is removed, bend the rib side of the belt and place the gauge down into its ribs. If you can see light between the bottom of the gauge and the tips of the ribs, the belt is OK. If the gauge bottoms out, the belt wear is significant and failure is imminent.
5. If you remove the belt, check all the pulleys for contaminants or wear that may lead to increased belt wear. Road debris can mark or damage drive pulleys. Rotate all accessory pulleys by hand and feel for bearing roughness, axial movement or free rock. Free rock can be checked by forcing the pulley fore and aft. A rough bearing or free rock indicates potential for immediate failure and the pulley should be replaced. Axial movement could result in belt misalignment. While rotating the pulley, look for an accumulation of foreign material on the pulley surface and remove it. With the proper tool, move the tensioner arm as if installing a new belt. If you are able to do this by hand with minimal force, the tensioner probably needs replaced. Move the arm through the full range of available travel. By feel, you can detect if there is roughness or sticking of the tensioner arm during this movement. If sticking is detected, replace the tensioner. As a final step, attempt to move the tensioner arm toward and away from the engine. If looseness is detected, the bushing in the tensioner has worn excessively and the tensioner should be replaced.
6. Proper belt thickness can be confirmed with the notched corner of the belt inspection gauge. Try to fit the belt into the groove of the tool. If it fits, wear is occurring and belt replacement should be considered.
7. Once the belt is removed, look at the flat or backside of the belt. If cracks, loose fabric, edge fraying or cord are visible, it is time to replace the belt. This type of failure is not typical and is probably being caused by a backside pulley. Be sure to inspect the pulleys closely for any signs that may be contributing to this failure.
8. Finally, install the belt and make sure it is properly engaged in all the pulley grooves. This may seem like a simple procedure, but is commonly overlooked. Start the engine, let it run momentarily and then recheck to make sure the belt is still engaged. A misaligned rib can result in belt failure shortly after installation. When running the engine, listen with a focus on the accessory drive system. Squeaks indicate belt slippage or misalignment. Squeaks and squeals can be caused by insufficient belt tension which may require tension adjustment, tensioner replacement or in the case of a stretch belt, belt replacement. Chirp at idle speeds, particularly in high humidity conditions, is misalignment induced.
Accessory drive systems have made significant advancement in recent years. Life expectancy of a properly designed and installed accessory drive system can be in excess of 100,000 miles. It’s beneficial to replace the wearing components of the belt drive system simultaneously since the individual components of an accessory drive function as a unit. When a worn belt, tensioner or idler needs to be replaced, it is advisable and economically prudent to replace the system.
Article provided by Continental Contitech.

